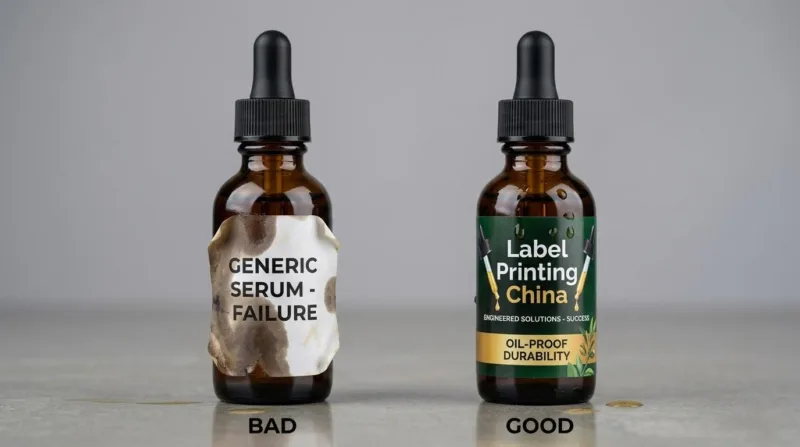
Most “oil-proof” labels fail the moment they hit the retail shelf, destroying your brand’s luxury appeal. After many years of engineering high-end packaging solutions, I’m sharing the exact technical blueprint you need to ensure 100% label durability.
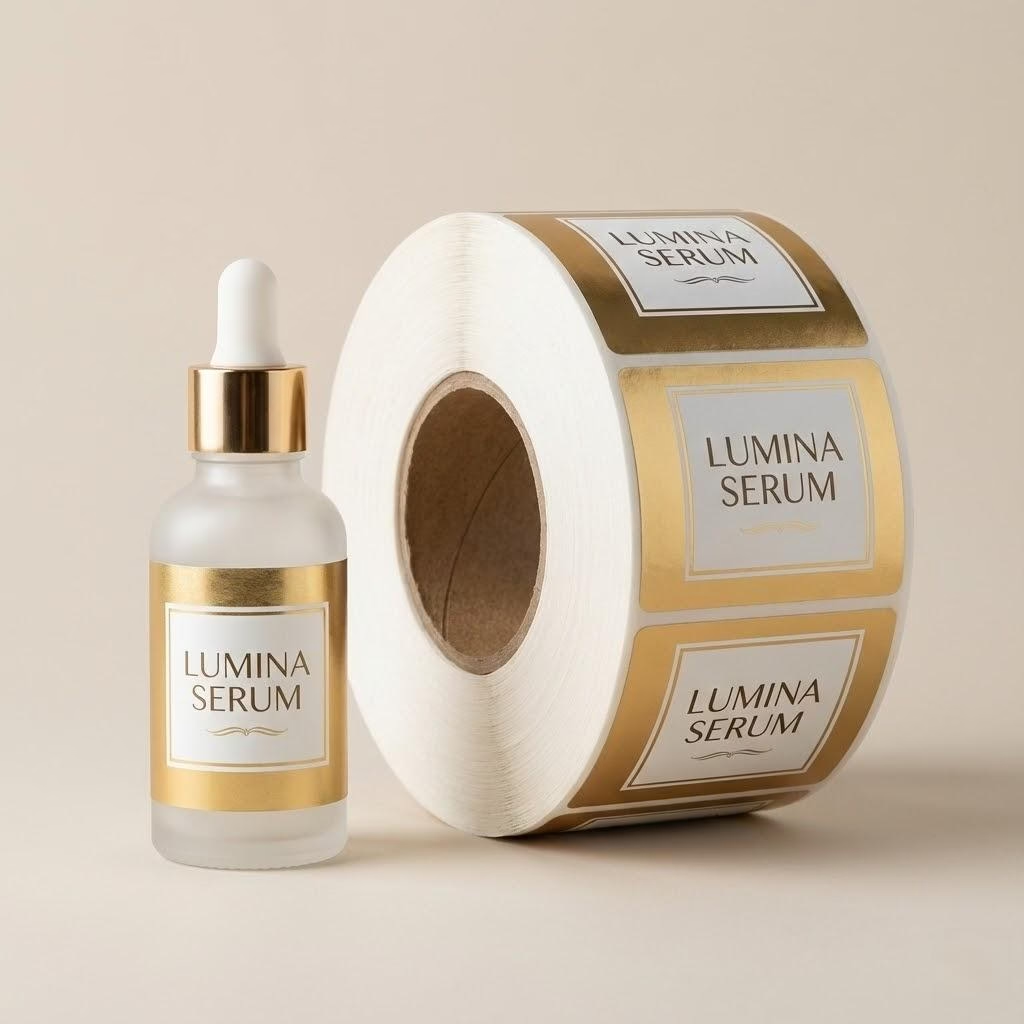
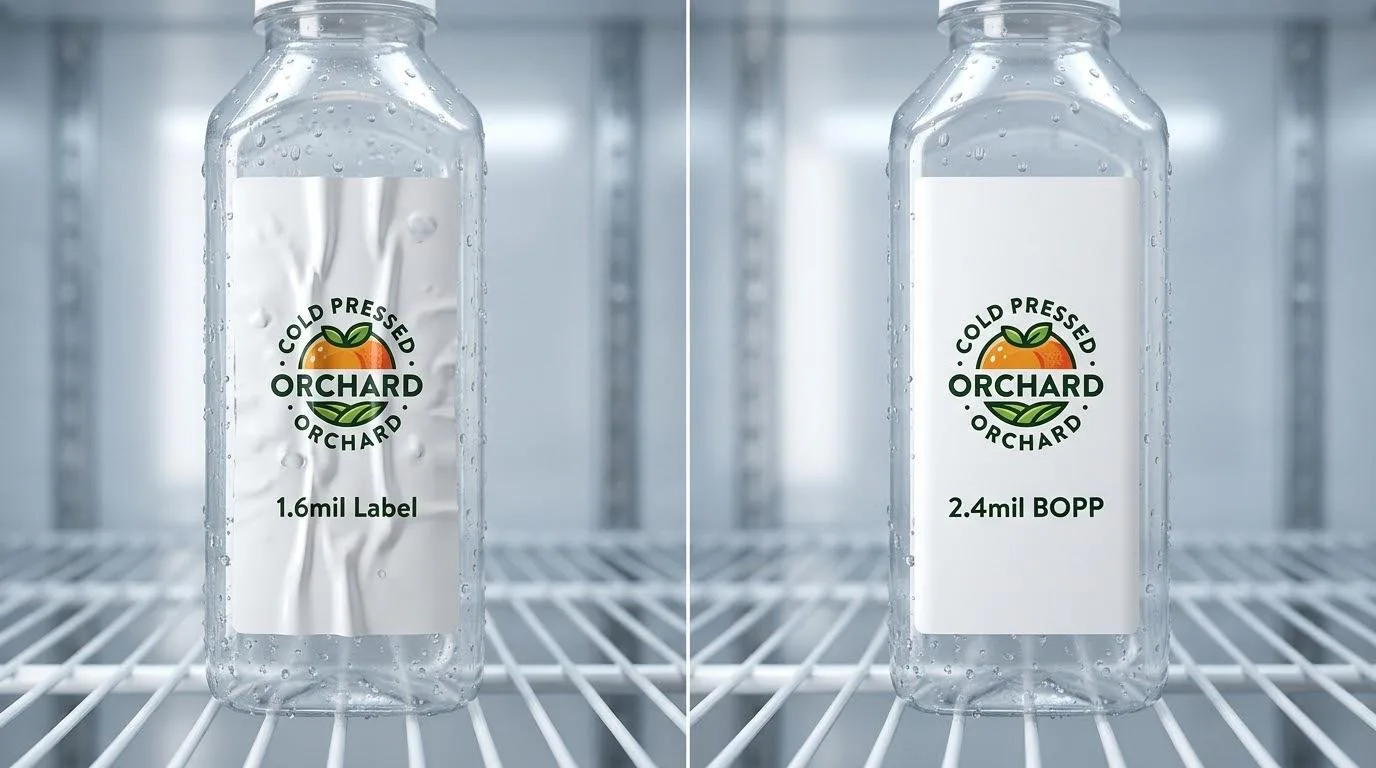
The best oil-proof solution for serum labels is a multi-layer barrier of 2.4mil top-coated BOPP film paired with high-tack permanent acrylic adhesive. This engineering stack stops essential oil migration from degrading the bond, preventing ink smearing and edge-lifting for premium skincare brands.
But there is a catch: even the best glue fails if you don’t account for bottle curvature. Keep reading to see the “1/10 Rule” and the real-world data that saves thousands in product returns.
1. The Chemistry of Failure: Why Standard Labels Fail
Most labels are designed for “water resistance.” But essential oils and alcohol-based serums are not water; they are aggressive organic solvents. Specifically, compounds like Limonene and Linalool act as plasticizers at a molecular level.
These chemicals don’t just sit on the surface. They search for the lowest point of surface energy—the edge of your label. Once they penetrate the adhesive matrix, they cause Polymer Swelling, which expands the adhesive layer and drastically reduces its cohesive strength.
When the internal structure of the glue softens, the label loses its “bite,” leading to immediate edge-lifting.
The Comparison: Material Performance Under Stress
| Feature | Standard Paper | Generic BOPP (Film) | Engineered Chemical-Resistant Film |
|---|---|---|---|
| Oil Absorption | High (Rapid Discoloration) | Moderate (Edge seepage) | Zero (Total Chemical Barrier) |
| Ink Anchoring | Poor (Smears upon touch) | Fair (Wipes off with solvent) | Superior (Cross-linked UV Link) |
| Adhesive Stability | Fails in < 4 hours | Fails in < 48 hours | Stable for 6+ Months |
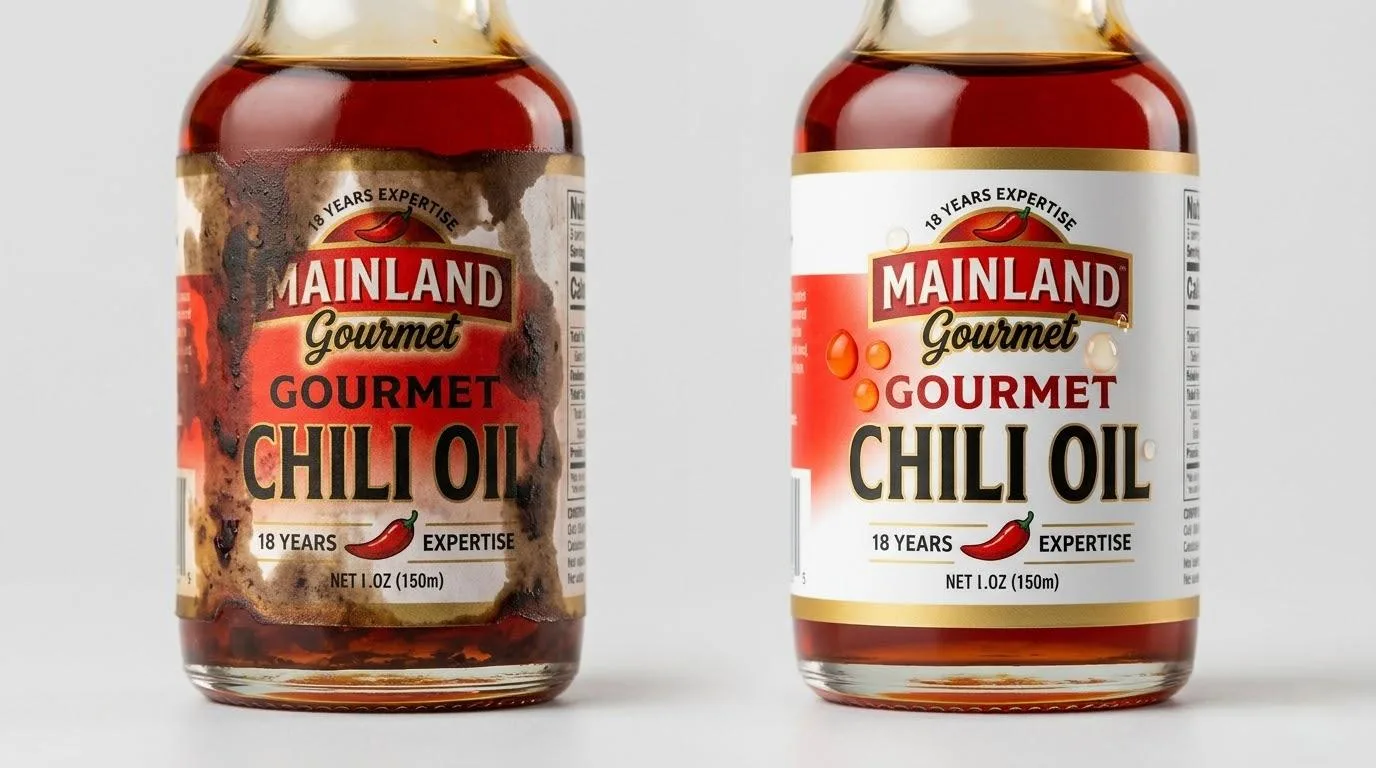
The “Micro-Penetration” Effect
Label erosion starts at the die-cut edge. Capillary action draws the oil between the film and the adhesive. Over time, the oil migrates toward the center of the label, causing a “graying” effect on white materials.
To stop this, the adhesive must have high Cohesive Strength, meaning the internal “glue” molecules are more attracted to each other than they are to the incoming oil molecules.
- Step 1: Essential oil spills or “mists” during the automated filling process.
- Step 2: Oil migrates under the label edge via capillary action.
- Step 3: The adhesive matrix begins to “plasticize,” losing its structural rigidity.
- Step 4: The label “flags” (lifts up) as material memory overcomes the weakened bond.
2. The Physics of “Label Flagging” on Small Bottles
If you are working with 10ml vials or 30ml dropper bottles, you are fighting a battle against Material Memory. Every time you wrap a flat piece of BOPP around a tight curve, the internal plastic fibers are under tension. They want to return to their original, flat state.
The 1/10 Engineering Rule
To prevent edge lifting (flagging), the total thickness of your label stack—including the Facestock, Laminate, and Adhesive—should not exceed 1/10 of the bottle’s radius. If the label is too stiff, the “spring force” of the material will eventually win the war against the glue.
- 10ml Vial (7.5mm radius): Maximum target thickness is < 2.8 mil. Using a 4.0 mil “luxury” stock here is an engineering disaster.
- 30ml Dropper (15mm radius): Target thickness < 5.0 mil. This allows for slightly thicker textured stocks or heavy laminations.
Protect Your Cosmetic Brand’s Luxury Identity
Your luxury skincare demands more than just a sticker. We provide oil-proof labels meeting all required quality certifications to keep your branding pristine through every drop of oil and serum.
3. The Multi-Layer Barrier Solution
To achieve a 100% success rate, we move beyond a single material. We build a technical stack. Each layer serves a specific purpose in the chemical defense strategy.
Anatomic Breakdown of a High-Performance Label:
- Chemical-Resistant Overlaminate (1.0 mil): This is not standard tape. It’s a specialized film that protects the ink from external exposure and physical scuffing.
- UV-Cured Inks: These inks are “cured” instantly by high-intensity light. This creates a hard, cross-linked polymer bond that is naturally more resistant to chemical fading.
- High-Anchoring Top-Coat: This is the “secret sauce.” We apply a microscopic primer to the BOPP that increases its Surface Energy. Without this, your ink is just “resting” on the surface and will wipe away with one drop of oil.
- 2.4 mil White BOPP Substrate: Chosen for its Dimensional Stability. It doesn’t expand when wet and provides the perfect backdrop for vibrant colors.
- High-Tack Permanent Acrylic Adhesive: A specialized formula that balances Initial Tack (instant grab) and Ultimate Bond (long-term stay).
Visual Anchors: Key Decision Points for Sourcing
- Specify the Dyne Level: Ensure your supplier tests for a surface energy of 38-40 dynes/cm using a Dyne Test Pen. High surface energy is the foundation of ink anchoring.
- Demand High Initial Tack: You need an adhesive that grabs the glass surface within 1 second of contact to prevent material memory from starting the peeling process.
- Check the Liner: For high-speed automatic labeling machines, use a PET (Clear) liner. It is thinner and stronger than paper liners, allowing for more labels per roll and fewer breakages on the production line.
4. Real-World Experience: The “New York Roller” Disaster
A luxury aromatherapy brand in New York once ordered 50,000 labels for their 10ml “Focus” roller. They insisted on a thick, 2.0 mil “premium” matte laminate because they wanted a “sturdy” feel. On the sample roll—applied by hand—everything looked beautiful.
Once the bottles hit the retail shelves in high-humidity boutiques, the labels started “flagging” within 72 hours. In the high-end skincare market, thickness is often the enemy of performance. The laminate was too stiff for the 15mm bottle diameter, creating a constant tension that even the best glue couldn’t hold.
When they came to us, we performed a Static Mandrel Test—wrapping the labels around a rod and placing them in an oven. We realized the thickness was the root cause. We downgraded the laminate to a more flexible 1.0 mil matte film and swapped the glue for a High-Tack formula specifically designed for glass.
- The Result: 0% failure rate over 12 months, and the brand actually saved 12% on material costs.
- The Lesson: Don’t mistake thickness for quality; focus on Curvature Compatibility.
5. The Economics: Factory-Direct vs. Middlemen
In the B2B world, transparency is your best cost-saver. Buying from a trade company often means you are getting “off-the-shelf” materials rather than engineered solutions.
A generic ‘oil-proof’ label might cost 2 cents less, but if 1% of your bottles are rejected by retailers, your total cost of ownership (TCO) skyrockets.
| Cost Factor | Generalist Printer | Factory-Direct (Label Printing China) |
|---|---|---|
| Material Transparency | “Oil-proof” (Generic Brand) | Avery/3M Technical Data Sheets |
| Customization | Limited to stock materials | Adhesive chemistry tuning |
| Lead Times | 14-21 Days (Reselling time) | 5-7 Days (Direct production) |
| Production Security | Potential batch inconsistency | ISO-Certified Quality Control |
Ask your supplier:
“What is the 180° Peel Strength of this adhesive after 24 hours of exposure to citrus terpenes?” A vendor sells you paper; an engineer sells you certainty.
6. Compliance and Safety: The MoCRA Factor
With the Modernization of Cosmetics Regulation Act (MoCRA), the FDA is focusing on every component of the package. It’s no longer just about the serum; it’s about Adhesive Migration and material safety.
- The Risk: Low-quality adhesives contain volatile compounds that can migrate through plastic bottles, potentially contaminating the formula and affecting its stability.
- The Solution: Insist on materials that are FDA 21 CFR 175.105 compliant. This certifies that the adhesive is safe for use in proximity to food or cosmetic products.
- The Proof: Always request a Certificate of Compliance (CoC). This is your legal shield against liability and ensures your brand is ready for global export.
7. How to Secure Your Brand Today
If you are launching a new line or fixing a current labeling failure, follow this 30-day implementation plan to ensure 100% machine-ready precision:
- Audit Your Bottle Surface: Glass and PET vary widely. Use a Dyne Pen to test surface energy. If it’s below 36 dynes/cm, you must use a high-tack adhesive.
- Request a Static Mandrel Test: Have your factory wrap your label around your specific bottle and leave it in a 40°C environment for 48 hours. If the edges lift even 0.5mm, your material stack is incorrect.
- Optimize for Automation: Ensure your label “release force” (how easily it comes off the liner) is calibrated for your machine speed. PET liners are superior for high-speed lines.
Summary Checklist for Packaging Engineers
- [ ] Material: 2.4 mil Top-coated BOPP (Essential for Dyne levels).
- [ ] Laminate: 1.0 mil Chemical-resistant PET/PP (Balance flexibility).
- [ ] Adhesive: High-Tack Permanent Acrylic (FDA 21 CFR 175.105 Compliant).
- [ ] Print: UV-Cured with Delta E < 2.0 color consistency.
- [ ] Testing: 48-hour immersion + Mandrel curvature test.
Conclusion: Stop Guessing, Start Engineering
Finding the right Oil-Proof & Chemical-Resistant Solutions is the difference between a product that sells once and a brand that builds a lifetime of trust. Don’t let a $0.05 label ruin a $150 product.
At Label Printing China, we don’t just print stickers. We engineer protection. We understand the chemical interaction between citrus oils and acrylic polymers. We know why a 10ml vial needs a different “flex” than a 100ml jar.
Ready to stop the erosion? Contact our engineering team today for a Free Material Stress Test. Send us your empty bottles, and we will return them with a custom-engineered label stack that is guaranteed to stay pristine through the entire product lifecycle.